Showing posts with label buttons. Show all posts

Tuesday, September 6, 2011

Busy makin things happen.

Pin It

Duh-ANG Girl, talk about blog neglect!  I'll tell you what, I've been crazy kid busy the past 2 weeks.  Not cause I'm getting my kid ready to go back to school--we're a good 5 years out from that--just crafty busy.  My friend Amanda who owns her own salon has been sweet enough to let me have a B.Cheniful space and sell my goods--soooo sweet of her!  Well good news for me, my first line I brought in sold really well and I've been working feverishly on a new fall line to replenish her.  Did I mention how awesome she is for letting me do this?  I mean, it's like an everyday craft show for me!  Too cool for school.  Fo Sho.

Here are some of the items from the fall line.  See the tutorial here to make your own!
This might be my favorite headband of the fall line!


Grey and yellow never get old!

I think the buttons really give these all just the right touch.

Doesn't this remind you of a fun fall carnival?  

So, yeah there's that.  I've also signed up for 4 craft shows this fall, so between Amanda's salon and trying to keep up stock for my upcoming shows, I've been one busy gal!  

Please don't give up on me, I'm still here!  I'm hoping to show you some more things before the week's up!  

Big (Fall Line) Smile,

Friday, August 19, 2011

Handmade Baby Shower Banner

homemade crafts
Pin It

Oh hey.  Wanna see something so cute that I could about die?!?  You do?  Perfect! 

It's a B.Cheniful Original and everything!  (ok, when I say original, I only mean original to me, CLEARLY someone out there has done this.  But mine's cuter, okay!?!)

So this goes along with the Owl Theme Baby Shower (click here, here, and here for more awesomeness). 

I made (handmade, btdub) this "Welcome Baby Rau" banner for the shower.  Rau is their last name, not the baby's first name.  We don't know the name, cause it's a surprise!  Yo, I'm such a brat!  Sorry Leah!!!!  It's only because I want to be making gender specific things right. this. minute.

Chenyways, howsabouts I just show you this bad dad, huh?  Ok then.

So I used my Sily (silhouette machine) to make stencils that I traced onto the fabric.  I traced it on the back of the fabric so I wouldn't have to worry about any pen marks.  Unfortunately, someone forgot to reverse the fonts and had to start all over.  On the face of the fabric.  Ah yes, my impatience bites me in the ass once again! 


Then I cut all the letters out--FINALLY.


Next I hand-stitched the letter on to felt, stuffing them with that stuffing stuff.  you know what I'm talking about right?  batting?  Man, I have got to brush up on my craft terms--how will anyone take me seriously?!?!  :-)

So yeah, batting.  Stuffed it.  And I did that with every. letter.  
I added buttons to the a's/b's/o's etc.  Finally I laid out the words as I wanted and then glued a ribbon behind.  Nothing fancy.  A little hot glue, a few corona lights, it was all good.


Here's the final!


See, look at that!  Okay, so maybe I'm a little too excited about muppet letters and whatnot, but man, I put some LOVE into that banner.  You'd think I was birthing this child!  

I'm not.

Big (Tah Freaking Dah!) Smile,
B.Chen


all crafts Homemade Projects ~ Add Yours {8/16}

Friday, July 29, 2011

A little love for Paper Wings

Paper Wings Hairband. 
My of-the-moment fav color combo
Oh hey--it's been like 10 years since my last post....HI! 

So I wanted to share a little love for Tracy at Paper Wings (yo, check out this stupid-AWESOME wreath she just made!!!  I practically jumped through my computer!) 

See that awesome hairband I'm rockin (AND, wearing my new fav color combo!)?  Well she sent that to me.  Now let me tell you why....

Remember the time I did the 100th Follower Giveaway?  Sure you do!  Well Tracy signed up but didn't offically win.  She did however leave a funnyass comment, so I decided she should have a freebs anyway!  It went something like this:
Tracy said... Best Blogger Tips

I liked you on FB!! :)

Come on, woman, I need that headband!! :)


So I decided she should have one!  A custom "cute as a button" hairband just for my girl!  Of course I forgot to take a photo (Dear B.Chen) but she chose this one as her inspiration:
Henyways,  as a thank you back to me, she sent me the darling red poppy hairband.  How awesome is that?!?!

Thanks Tracy, I hope you're enjoying your B.Cheniful hairband, too!  :-)

Big (Paper Wings) Smile,
B.Chen

Tuesday, May 10, 2011

How-To: Cute as a Button Hairband

Pin It
You probably have a pretty good idea about my love for buttons, espeically after this post.  I'm always looking for ways to incorporate them into designs, which really isn't as easy as one would think....BUT, I was messing around last night and an "um, DUH" moment hit me.  Why the hell haven't I been using them on hairbands?  Like really using them, not just adorning them on a fabric flower.  So, I went for it!  And you can to!  Check out my how-to below!


Supply List:
buttons!  
3 3-inch felt rounds
thread and needle
hot glue gun
elastic hairband


Step l.  Arrange your buttons on 1 of your felt circles to give you an idea of what you're looking for.  

Step 2.  Sew your buttons down on felt.  Once you're all set with that, flip over and glue another felt circle over the exposed threads.  

Step 3.  Glue down hairband to back of felt circle, then place last felt circle over exposed band.


Step 4.  Rock it Girl!
I made a bunch more!!!


Thanks for stopping by!
Big Smile,
B.Chen
DIY Club

Sunday, May 8, 2011

Just can't get enough of Yarn Wreaths!

Pin It


No seriously, I make at least 2 of these a week.  Some to sell, some as presents, some for ME, etc....I just freaking LOVE them.  No two are ever the same and it's awesome to play around and try different color combos and decor pieces.

Here are a few that I've made recently.  Ok, you may have seen some before, but there's nothing wrong with a little YW Roundup!

*in case you've never made one yourself, here is an AWESOME tutorial seen at thirty handmade days.
new summer wreath for ME!
I love her.  
custom rustic yarn wreath
that pinecone was kind of a B, but I got it!
A custom beach-themed YW.

Love the way this turned out!


Yo, it's FINALLY spring in MI!
pretty in pink YW!

Perfectly Purple.  And Violet.
we're thinking spring over here!
This was made custom for my cube.
Blaise's Birthday YW.
This was made custom for my mini bath revamp.
I made this bad boy for my front door.  I'm so selfish.

This is a donation for a Make a Wish silent auction.

So there you go!  A couple newbies, a couple oldbies.  All awesomebies.

Big Smile!
B.Chen


Sunday, April 24, 2011

A couple more things....

Pin It
Did I mention that all I did all weekend was craft?  On top of my Mini Bath Revamp, I also worked on more decorative balls--this time using yarn instead of hemp, and sure to be a new favorite, anthro inspired blooms, found at Homemade Ginger.

First things first, I loved the way the Decorative Twine Balls turned out last week.  I started thinking that I'd really like some in color, without having to spray paint--dude, it's so messy!  So, I figured that I would just use yarn in the color I wanted.  This time, it turned out to be yellow.

A couple tips:
Warning, do not use synthetic yarn unless you're going to be hardcore adhesive mixing!  It just didn't hold its shape, even 24 hours later.

What I did have great luck with was Lily Sugar n Cream, a more thread-like based yarn that really held it's shape perfectly.

Check Check, Check it Out!
Find the tutorial here!

Pin It

The process.....

The outcome!

Sunny and perfect for spring!

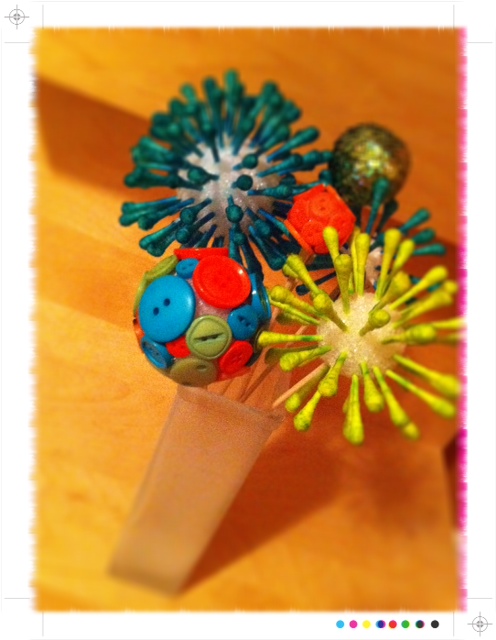
Keeping with the theme of awesomeness, on to the Anthro Inspired Blooms from Homemade Ginger! I fell in love with these the second I saw them and literally ran upstairs for Q-Tips.  Seriously.

These were super easy but a little messy.  No bigs compared to the results though.

You can make these in any color or size.  I used three sizes of styro balls, small/medium/large, two in turquoise and one in green.
See the tutorial here.

Since I was on a roll, and I'm super in love with buttons, I also did a couple button flowers.  All I did was hot glue buttons on to a styro ball and stuck it with a skewer stick.  Damn they're handy!

Here's a closer (kinda) look at the Button Flower:

So there you have it, almost everything I did over the Easter weekend :)

Big Smile,
B. Chen