Showing posts with label no-sew. Show all posts

Tuesday, January 17, 2012

Admire? Acquire!: Drop Earrings

So....they're not an exact match. 
They're just B.Chenified a little more :)

Hey girllllls!

So.  What do you do when life gives you a broken necklace? You make cool shit! Earrings to be exact.  Knockoff Kate Spade Earrings. You break that sucker up and up-cycle, yo! That's what I did anyway.  :-)

So....I hoard everything. Just in case. And tonight, it paid off. I was looking for a third project of the night--the 2 others aren't ready to show quite yet--and came across it in one of the many crevasses of the Creation Station. My Mother would call it a "hell hole." My dad would appreciate the mess.  :-)

I had this necklace from Target Boutique I bought a couple years ago--it was a J.Crew knockoff--and I think it broke before I even wore it. I'll bet the J.Crew necklace wouldn't have broken. If only I could afford J.Crew whenever I want......#brokeisthenewrich.


Chenyways, here we go!
Ingredient list:
Broken Necklace (or one you're sick of)
Pliers
Earring Hooks


Step One:  Using the pliers, I broke up my necklace to begin my earring design.

 Step Two:  I added parts of the chain to to support the sides.

Step Three:  Next I used a jump ring from the necklace to attach the earring hook.

Step Four:  Well, girls, that's it.  And it appears that these babies are READY TO ROCK!


What do think????  Cute, right?  Rock-tastic, right?  RIGHT!  :)
Your turn!  :)

Big (damn it feels good to be a gangsta) Smile,

Friday, January 6, 2012

Coffee and a (hair bun) Donut

Pin It


My chocolate hair bun donut
DAMMIT.

Guess who called me out AGAIN for being absent on posts?  One J I think I know everything Chen.  This boy drives me up the wall--especially when he's right. I really don't have anything to blame it on--just myself.

So once upon last week I was surfing Pinterst in search of all things donuts--another obsession of mine, like cupcakes, except unlike cupcakes, I love to eat these the most of any sweet in the world--and came across these hair bun donuts.  I am the queen of messy buns so I had to check this out.  The tutorial is here at Refinery29, a site that I love love love.

It's easy, free, and best of all, looks awesome!

The donut is just a sock, toe cut off, and rolled up into itself into a "donut".   Throw your hair up in a pony and put the donut through.  You may need to rat your hair a little--depending on your hair type.  Then just use the end of your rat comb to tuck in the hair under donut.  Pin as necessary, spray that bad boy and ROCK IT GIRL!

I made a bunch of these--one to throw in my hot yoga bag, one to keep in my purse, and another just waiting in the bathroom to get ROCKED.  I made mine in both white AND black, since my hair these days is a super dark "cherry cola" of sorts.

Wanna see how it looks?  Sure you do!


A messy bun is the perfect companion to any sort of hairband or clippy.  It's allllll good :-)

This is for sure a "Do it GAL"!  So, do it already!  Rock it gurrrrlllll.  :)


Update:  Guess what I found while hanging on the inet?  Um, a real life "professional" hair donut, from ASOS.  It's only $6....but why not just make it for free?  :)

Big (Yummy Yummy Hair Donut) Smile,

Wednesday, December 28, 2011

How to: Mod Podge an Initial Letter

Pin It


Hi Friends!  :)

I hope you are all having very merry holidays this week and last.  :)  I am!  We had a great time on vacation in Cozumel from the 16th to the 23rd and then spent time with the fam(s) on the 24th and 25th.  I was lucky enough to have Monday off as well and spent the day laying around with Bacon and Cheesy.  We missed those babies SO HARD!  No really. Like talked about them ALL THE TIME--on the beach, at dinner, at breakfast, during nap time--and even would pull up photos because we have no life missed them so much.  Chenyways, we had a blast but we're happy to be home. The End.

Ok, back to B.Cheniful.  So last night J Chen was stalking me asked me where a new post on the blog was.  I mean, damn boy, we just got home!  Was he not aware of the entire paragraph of life I just wrote above?  Yo, I've been BUSY!  But....he was right, it was time to get my butt in gear and do something!
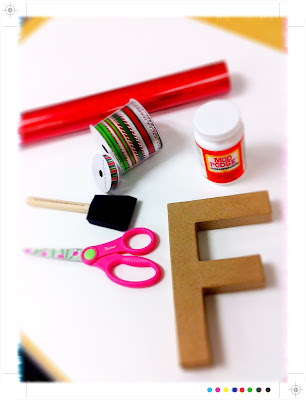
Ingredient List.
I feel like this may be coming a little late in the season--when I did this project it was for the holidays--but it can be applied to pretty much anything.  I mean, this initial I'll be showing you turned into an ornament, but could just as easily be used as decor, or even on a wreath.

Alright, enough rambling, let's just get started!

This tutorial has A LOT of photos.  I think that's ok, yes?  We'll just call it a "picture tutorial".  There, done.

Ingredient list
Initial Letter of your choice--mine was a cardboard type, but it could be wood or foam, etc.
Mod Podge
Foam Brush
Paper to cover--I used wrapping paper, scrapbook paper is great too!
Scissors/Exacto Knife
Ribbon or Twine--Optional

Step One:  Start with your paper about twice the size as your initial.
 Step Two:  Turn your initial over so it's backwards.  Apply Mod Podge to side and top as shown, and bottom (not shown):
Step Three:  Place initial on paper giving you enough space to wrap the paper on the side and over the top, as shown:
Step Four:  Firmly press paper to Mod Podge sides and smooth out any bubbles, as shown:
Step Five:  This is where is starts to get tricky......and messy.......and well, crafty. ;-) Cut into the corner of the paper, as shown:
Step Six:  Now, cut out a little piece of paper and fold in half to make a corner, as shown:
Step Seven:  Mod Podge corner and apply paper, as shown:
Step Eight:  Mod Podge the inside of the bottom initial and fold up the side of the paper.  Flip Over the initial and Mod Podge the top, as shown:
Step Nine:   Press paper firmly to the top, smoothing out any bubbles.  Flip initial back over and begin folding up the paper to cover sides, as shown:
Step Ten:  At this point there's nothing left to do but wing it!  I had to add little pieces of the paper to fill gaps--but that's why you do it on the back side!  No one will ever know ;-)  A tip:  If you're having trouble with the ends, just wrap them like a present :)
Step Eleven:  Once your initial is totally covered in paper, go ahead and place a layer of Mod Podge all over it, as shown:
Step Twelve:  Now let that baby set until it's dry to the touch--then go ahead and add another layer if you want.  Up to you girl!

Step Thirteen:  Place your ribbon or twine (if you're using as an ornament or wreath-whatnot) around the initial to hang and.....ROCK IT GIRL!  MMMMM HMMMMM.  
Keep going......Keep rockin!
That's it!  Ok, so it's not the easiest project in the world--not by a LONG SHOT--but it's a project that allows you to eff up and keep moving on.  And those my friends, are my favorite :)

Big (Dang Picture Tutorial!) Smile,

PS--in case you were wondering why I did an "F" as opposed to a "C" (you totally were, weren't you?!?!) it's because I did this for work. The "F" is a tribute to the founder of our company who passed on Black Friday, at 91. Kinda fitting since we're a retailer. He will be missed.

Thursday, December 1, 2011

How to: Make a Fabric Scrap Holiday Tree

Pin It

Hi Dolls!

I hope you're all having a fan-tabulous Thursday!  :)  So I thought I'd show you a little something I made last week, which btdub, I was sure J Chen would hate but made anyway.  Cause I'm sweet like that!  ;-)

Now, I would agree that this isn't my "usual style".  It's a little more shabby chic/country than my typical contemporary creations.  BUT, I do what I want.  So there you go.

Oh, did I mention this is the easiest creation ever? :-)  

So I bought these floral tower thingies back in October for my craft shows (to hang my hairbands on).  Well, as the season progressed, I found better ways to display them and no longer had a need for these dudes but I couldn't just have them sitting around....J Chen gets a little fussy about that.... ;-)


Chenyways, less talk.  More tutorial Action.

So, ingredient list then?  
Weird Iron Floral Towers--I got mine at Hobbit Lobbit over by all the millions of artificial flowers.
Christmas Lights
Scrap Fabric, cut or ripped to approx. 7"x2" inch strips

Step One:  Wrap your lights around the tower.
Step Two:  Tie your scraps on the tower.


Step Three:  Plug that sucker in and ROCK IT GIRL!
We keep one the kitchen counter....
and one on the cool desk that we use
purely for decor :)

Oh, and guess what?  J Chen actually liked them!  Well, when they're lit anyway.  :)

 Big (wasn't that soooo easy?!?) Smile,

Monday, November 21, 2011

Ice Cream Sundae Pincushions!

Pin It

Oh Hey Pretty Gals!

So, you know how I was all worried that I was a total one-trick pony not very long ago, regarding wreaths? Well, look at me now, getting my pincushions on!  Last week I showed you how to make some awesome Cupcake Pincushions that will totally rock your friends/relatives world, and this week I'm going to show you a new twist on more yummy pincushions.

So what happened was I ran out of ramekins and I couldn't find any at the dollar store.  Cause listen, you gotsta keep your costs down, yo!  But what they did have were glass sundae dishes and regular white ice cream dishes.  Well, since I'm super in love with things that look like food, I was all over this idea!

For the ice cream dishes, I made these the same exact way I did the Cupcakes.  The only difference was that I added whipped cream and a cherry.  For the whipped cream, I used fuzzy baby yarn and wrapped it around my 3 fingers about ten times, making a mound.  Then I just glued that on the top of the ice cream and added a little red pom for a cherry.
aren't they super adorable!!!
For the ones that I like to call "Soda Shoppe Sundae", I made these a little differently. Because the glass is clear, you have to be careful about what you're using to fill it.  I used a pink fuzzy baby yarn to fill the bottom; I used the same yarn to wrap a styro ball for the ice cream.  Then I used the same whipped cream method as described above and added a cherry.  I put the pins in the whipped cream for sprinkles.  Totally adorable.  Totally nostalgic.  :)
mmmm, scrumptious!  
So, what do you think?  Clearly I think they're fab ;-)

Big (Saturday, Monday, we all scream for SUNDAE!) Smile,

Wednesday, November 9, 2011

How To: Make a Cupcake Pincushion!

Pin It

Ok, whoa.  Am I ever feeling guilty!  Like, seriously.  I feel like such a jerk for neglecting my blog.  :-(  Eh.

BUT, I'm totally gonna make it up to you with this kickass/easyass tutorial of greatness!  No, but for real, people are going to think you're so effing clever.  Mmmm Hmmmm.  Wanna play?

OK THEN!  Did I mention this was NO-SEW!?!??!  Cause it is.

Ingredient list for a cupcake pincushion:

  • ramekin bowl (cause who the hell knows what else to use them for anyway???)  
  • solid fabric
  • sheet of felt
  • quilt stuffing
  • rubberband
  • hot glue
  • pretty pins
Ok, cause I'm super stretched for time, I'm gonna reference this tutorial for the basics--like, the stuffing the fabric part.  They do a great job!  :)

So, now that you have the stuffing thing out of the way, all you have to do is hot glue the sucker into the ramekin.  Do a good job with this--no glue sticking out the top! Cupcakes are pretty, ok?  OK.  

NEXT, cut a felt circle and then freehand a "frosting" cloud thingy.  Basically a circle with scalloped edges.

Hot Glue that on the top of the fabric--not too much glue, this is a pin cushion after all and people will want to be able to push the pins in!  

Lastly, add your pretty pins to the top to look like sprinkles.  VOILA!  And you're welcome.  Now, tell me who wouldn't want this cutie for a gift?  You need to get some new friends if they don't just LOVE this!  


I love creating awesome things that I know people will adore ;-)
And that's that!  I'd stay for more but I have to make more cupcake pincushions for this weekend.

This is how I display them at shows, on a dessert tier:
see the teacups, too?  They don't sell nearly as well as the cupcakes.
I can't blame the people.  

Big (CUPCAKES!) Smile,