Showing posts with label keepin it custom. Show all posts

Thursday, October 20, 2011

Halloween Decor--on the cheap GURL!

Pin It


Happy thirsty Thursday Girls!!!!  Wow, can I just say THANK YOU for all the support on my last World's Biggest Whiner post?  For those of you who didn't read all about my timing whoas on Halloween Decor, I was basically complaining that I don't have enough time in the day to hand-make all the things I'd like to, and OMG, am I really about to BUY Halloween bunting?!?  Well, here's the update:  I DID buy it.  But I also made my own.  I totally caved.  In fact, I caved so much that I pretty much did hand-make and upcycle everything.  What is my deal?  I don't know, it really didn't take me as much time as I thought it would, seems how almost everything I used I already owned, or had on hand. Except for being one felt sheet short for my bunting.

So....wanna see my crazy go halloween stuff???  OK!
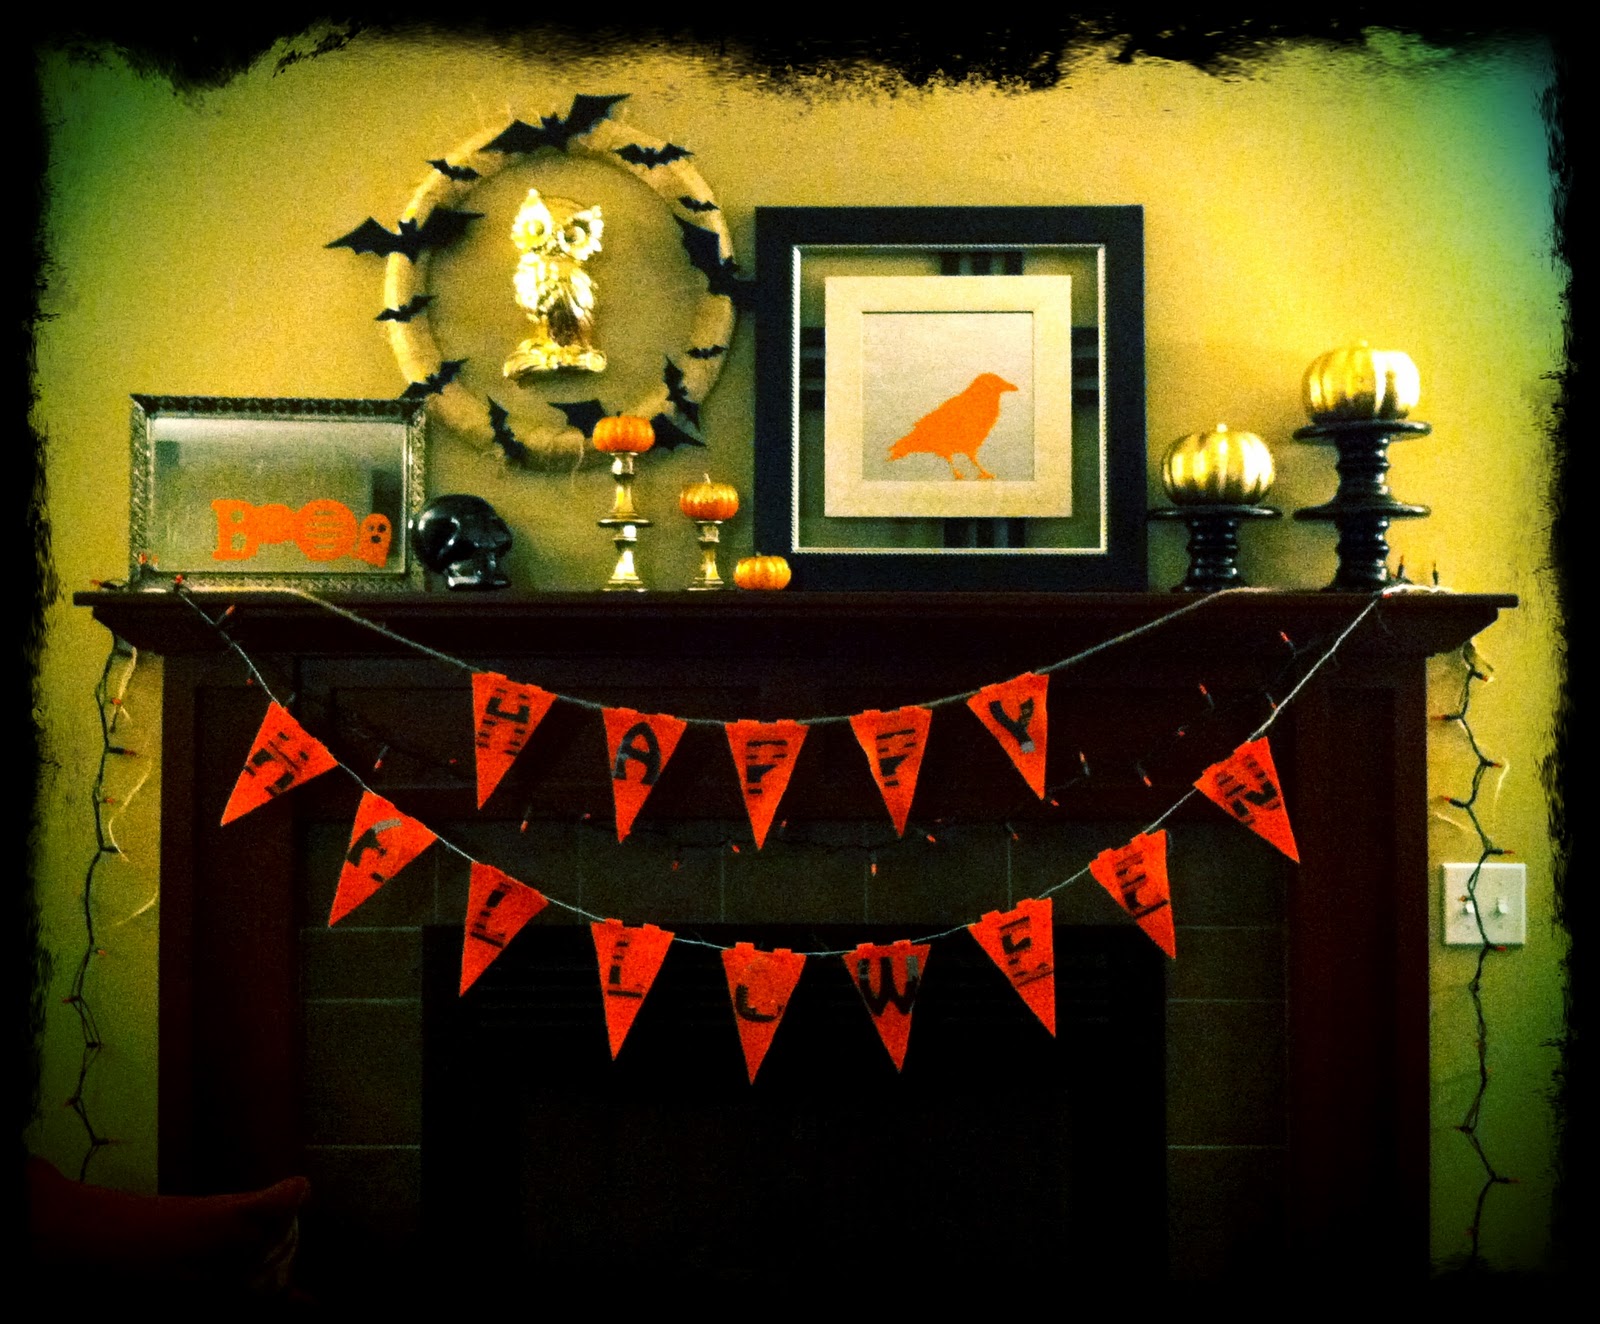
The Mantel.....Isn't she a beauty?  This is my first ever holiday driven mantel, you know, cause J Chen gets a little territorial on such things.....

The Bunting:  Made using the Sily as a pennant stencil and cutting out of orange felt. The letters were also cut from the Sily and hot glued to the pennants.  I used Jute and then some other weird jute-like rope I had (when the jute ran out).


From left to right....
The Boo Mirror Tray:  I picked up the tray from my favorite thrift store on half-off day over the summer for about $2.50.  I added the orange "BOO" using vinyl and my Sily.
Left side of the Mantel
The Black Skull:  Picked up from $ Tree and spray painted a glossy black.
The Wreath:  I used a large wire frame and wrapped it in burlap.  Next I cut out the bats using my Sily and black poster board from the $ Tree.  Then I just hot glued them on.
The Gold Owl:  LOVE HER!  I picked them (there's another!) up a couple weeks ago from a vintage shop for $2 a piece.  Engraved in the clay on the back is "1975" and a name.  VINTAGE YO!  I spray painted them gold.
Gold Candle Sticks and Mini Pumpkins:  I picked up the candle sticks at the $ Tree over the summer.  I spray painted them gold and then hot glued one on top of the other.  The mini pumpkins are REAL!  I painted on white glue to the tops and added gold glitter.  You can't really see them that well though....

The right side of the Mantel
From Right to Left:
Gold Pumpkins and Risers:  The pumpkins are also from the $ Tree, spray painted the same gold as all the other items.  The risers were used at our wedding in December 2007 for our candy buffet.   We start trends, ok?  Ok.  :)
The Mirror with the Crow:  The mirror was a Christmas present from my Mom in 2006 or 2007.  I added the crow using orange vinyl and my Sily, silly!  J Chen said it looked like Edger Allan Poe.  It's not a RAVEN, ok?

I'm planning on making a tablescape for the actual party, but I won't be able to get final pictures of that until that day.  Cause we're using our kitchen table, and again, J Chen gets all territorial over common areas.....BUT, I am able to show you this custom sunburst mirror I made just for the spot!

Try it yourself with my sunburst mirror tutorial!  
I used a plastic skull platter from the $ Tree and spray painted it black--as well as all the wooden dowels I had laying around (broke in half).  I had the mirror from a previous trip to the Hobbit Lobbit.  The little gold things on the dowels are spider and bat rings from the $ Tree, spray painted the same gold as every. thing. else.

I can't wait to show you the rest of the tablescape then it comes together!  Sure, it will likely be past Halloween Party Time, but you know, there's always next year :)

PS, I'll be using the store-bought bunting on the tablescape ;-)

Big (why sleep when you can create?) Smile,

Thursday, October 13, 2011

Onesie MANIA

Pin It


No, for real. It's MADNESS in the lower level of the Chen house.  Onesies everywhere.  J Chen LOVES craft show season!  :)

So yeah, took a break from all that wreath creating and moved on to baby onesies.  I started doing them this summer for Leah's little guy.  That was before my Sily had arrived so I did them all the freezer paper way.  But now I'm rockin the iron on transfer vinyl, and well, the world is mine.  And I'm free to make as many whitty/off-color/darling ensembles as I choose.  :)  Mommies beware.  

So, it's clear for the most part that girly onesies really corner the market.  I mean, it's all about the cupcake, (which I freaking LOVE, don't get me wrong girl!) the tutus, the cupcake tutus, you get the point.  So I wanted to make sure that I had some boy choices, too.  Seems how I specialize in wreaths and hairbands, I'm not exactly dude-friendly.  Little or otherwise.  So I took to my Facebook page and asked Moms of little boys what they want to see.  I got some suggestions of "rocker baby" gear as well as a request for more "Michigangster" goodness.  Being the pleaser I am, I took to it right away!  So, without further incoherent ramblings ado, here they are!

Let's hear it for the boys!

This reminds me soooo much of my Dad, Rexer!  There's this picture of him from the
late 70s where he has this long silky brown hair and this Mr. Pringles mustache.  Needless
to say, this little guy means a lot to me :)

Life is too short to listen to bad music.  amiright?

Baby, you are THE rock star!


Hello Mister Mans....

Look familiar?  Michigangster in Red.

This is the classy version ;-)
Alright, now let's give it up for the little LADIES!
All the flowers are detachable--you know, in case Mom wants to wear it!  Or, and because babies make gross messes and you're gonna have to wash this, like, 8 times a day!

Single strand with a delicate flower pin 

I really feel like this one is a timeless beauty.  Color Combo?  Stupid awesome.
ROCK IT GIRL!

This one I actually did with freezer paper.  The metallic gold is really awesome
in real life....however this photo, it's kinda eh.  

Just cause she's a girl doesn't mean she can't be a little
Gangsta too!  Hot pink for the little ladies :)

About the off-color comment?  I'm sure they'll be hitting a blog post near you soon.  :)

Stay awesome my Friends!!!!

Big (Rock that Onesie Babe!) Smile,

Wednesday, October 5, 2011

One Trick Pony?

Pin It

Am I?  A one trick pony?  That doesn't sound like me....does it?

I mean, I'm NOT, but right now I feel like one.  Because I'm focusing on Craft Show inventory right now, especially wreaths--cause they take for-freaking-ever--I feel like I'm totally neglecting my blog.  AND, only showing wreaths on my Facebook Page.  (Are you a fan yet?  You totally should be!  :) ) Oh, and because I clearly have some form of ADD, I can't concentrate on any one thing for too long.  So my inventory?  Sketchy.  Even though I've been staying up to all hours of the night....seriously, last Friday night?  Up to 4:45AM!  AM people!

Eventually I'll show the other cool shit I have going on, like:
iPad cases
infinity scarves
pin cushions
little gal aprons 
frames
onesies
holiday cards
coffee cup cozies
bird nest necklaces
etc.......

see?  Totally ADD.  Oh, and they're all in prototype phase.  Ha.

The truth of the matter is, the only thing I have to show you right now are (some) of my wreaths.  So you wanna see?  Totally not exciting, I know....sorry!  BUT, I'm still love them (and it's my blog ;-) ), so, there.

Ah, Christmas.  Right around the damn corner.  Check out the little weave action on this bad boy!
Pin It


I used a baby yarn on this--you could literally curl up with this wreath for a winter nappy-nap.
Here are two custom orders from my girl Kacy.  I LOVE when I get TOTAL creative license :-)  THANKS GIRL!


Not your Gramma's Christmas Wreath!  This, my friends, is a damn Winter Wonderland Wreath.  Sure to get you to Valentine's ;-)  (hint, hint Kacy.)
Pin It

A less crackhead version of THIS GIRL HERE.

Dontcha just LOVE glitter?  
Once Kacy saw this wreath in real-life--sold to the fabulous MSU-Loving-I-Bleed-GREEN Kristin--she needed a fall wreath, too!  Keep up the competition girls! Pin It

Girl, you know I love me some burlap!

that's a little embroidery hoop and a ruffled burlap flower.
And now, back to work!  

Big (oh my GOD, I hope I sell something!) Smile,

Friday, September 23, 2011

Custom Cushions--my first real sewing project.

Pin It

Warning--this is NOT a tutorial.  Please, I barely got through this myself!  It's very doubtful I could teach it....

So here's the thing about me--I'm not great at saying no.  Especially to friends.  Especially to friends that help me out all the time.  So when Amanda asked me if I could make some cushions for the salon's two pedicure chairs, I immediately said yes, sure, of course. Of course I can make custom cushions that require a real sewing machine, the basic knowhow to operate said real sewing machine, multiple trips to the fabric store, self confidence, and well, hours of my time doing something I know nothing about.  WAAHHHH!!!! 

But whatevs, Imma survivor, I'm not gon give up!

So, I went to the fabric store and searched for the prefect fabric to match her super awesome pedicure bowls:

Amanda picked my favorite fabric of the 4 (we're so in sync!), the bottom left one.

Now, here is where I MUST give the sweet lady at Field's Fabric a little shout out:  Sweet Lady, thank you for saving my ASS!  I took in the foam cushions and told her about my project.  She straight up took out a piece of paper and made cuts to show me how to work the corners.  Seriously, without her, I would have wrapped these Bs like a present!  I used that 3 inch diagram like my life was dependent on it the entire time.

Bacon loved the fabric too!  He's such a helper :)
GO MICHIGAN STATE!
The cushions needed to be 28x18 and 4 inches high.  The closest I could come was 22x22 at 4 inches high.  So meant cutting and pasting these guys:
picked up at hobbit lobbit
Next I just cut, placed and measured the best I could.  Again--NOT a tutorial!
Man, I love this fabric!
Well, my easy bake oven sewing machine broke in the middle of my nervous breakdown the project so I borrowed my friend Lila's.  All I can say is WOW, it's all about the machine!  Once I had a "good" machine, I literally flew through the last cushion (then went back and fixed the first one).  It just goes to show you that an extra $20 on a machine goes a LONG WAY.  I bought my own big girl Brother machine the other day and it's been such a great experience!

Without further ramblings ado, here are the new cushions!
the other one looks exactly the same--that's why you're only getting this one photo.
I guess that the other moral of the story would be that I'm glad that I took on the project--it always good to push yourself!  I'm no longer afraid to try sewing now--cause technically, I already did!  :)

Big (OMG, I did it!) Smile,

Friday, September 16, 2011

Birth Announcement Subway Art, using Picnik.

Pin It

Oh hey, howsabout I show you something on here today? Ya know, cause it's been a WEEK since I've hung out with you! I'm keeping with the excuse of prepping inventory for all these upcoming craft shows (that I can't stop signing up for) in October/November/December, AKA approaching-cold-as-hell months.

That's me with sweet little Gabe.
The vagina wrecker.
Chenyways, remember all those posts (and posts, and posts) I did about the baby shower for Leah? Sure you do!  Well, I'm thrilled to announce that Baby Boy Gabe arrived on August 27th! Clealry I ran right out to the store (at 10pm when Leah called) to buy little boy onsies and whatnot to B.Chenify, clearly AFTER asking how her vagina was feeling. Listen, I've never had a baby, I worry about these things! The answer wasn't great and I'm seriously thinking about waiting another 10 years to feel the same pain.

So I used my Sily to cut out fabric and heat transfers to make little Gabe onenies with 1. A tie  2.  A bow tie  3.  A Michigan State Block S 4.  A car.  Now, this is where I would normally show you a photo of the goods. Well I would, except I forgot to take the damn photo.  WHATEVER! Ugh.

What I did remember to take a photo of was the Subway Art that I made using Picnik.com, featuring all the birth info. So, I'll show you how to do that instead!

Now, you could make Subway Art in Photoshop or Publisher (if you have access), hell you could really even do it in Word, but I wouldn't.....You could certainly make it in the Sily but there you couldn't have it in a jpeg to have printed as a photo.

OMG, I'm annoying myself with that last paragraph. On to the "tutorial", if you can call it that...

1.  Go to Picnik.com
2.  Make an account.

3.  Upload a blank jpeg. I made mine in Microsoft Publisher cause I can't figure out photoshop to save my damn life, and then just selected sizes I wanted:  5x7, 8x10, 11x14, and saved them all individually as jpegs. You might be able to just pull from mine here:
Ok--I know you can't see it, but this is my blank 11x14 jpeg file.  Just right click to save and you'll be all set!

4.  Open the photo size jpeg you want--I used the 11x14 for my Subway Art. I usually add a little drop shadow frame so I know what I'm working with. You know, cause it's white and you can't see where it starts or stops?
See the little drop shadow I added?  Super helpful.

5.  Just start playing around. You need to give yourself time to figure how to work this program.  One you get the swing of things, you'll love it!  

Rotate text, change up fonts and colors.
6.  Just keep messing until you find what you like.  Here's my Final JPEG:
Not bad for my first try.  This child is my straight up Guinea pig :)
I sent this through Shutter Fly and had an 11x14 printed for $7.99, then framed it:
I took this in our living room, but Gabe's room is close
to the same color so I think it's gonna look awesome yo!
I'm thinking of framing one of these for myself and taking them to my craft shows for custom orders.  Fun, right?

Thanks for being awesome and stopping by!

Big (Baby Gabe is here!) Smile,

Tuesday, August 23, 2011

Owl Themed Baby Shower. Putting it all together!

Pin It

Well hey, girl, hey!  Heeyyyyyy!

So. I'm hoping you've seen the bunches of post I've done leading up to this one, showing you parts and pieces of this shower.  No worries if you haven't, we'll go over them again.  Luckies!

So let's talk Owl Themed Baby Showers.  They're hip.  The big thing these days. We picked this for Leah because it's a gender neutral theme and she and I had picked out some fabric for the nursery with owls.  So, there you have it, a theme was born.

The first thing I was all over was the tabelscape to be used for desserts.  No really, like I was emailing the Moms the very first day telling them all about my ideas.  I'm assuming it got pretty annoying, but I'm a passionate gal, ok?  Ok.

I started by gathering plates to make dessert tiers.
I found these on a business trip to Wegman's in upstate NY.

Just stack and super glue.  DONE.
Then I made some yarn balls and apple sticks for vases.  The yarn balls are only little sytro balls wrapped in yarn and then stuck on a skewer stick.  Easy but seriously cute! This is how I made the apples--pretty much the same thing!

Dollar Tree Apples.  Skewer Sticks.  Stick and place!


Pretty!
And then of course I had to mock it up:
I used skinny bamboo sticks for the background--from the $ Tree as well!
Ah yes, and now for real life.  Here it is!
Check out how well the bakery did at matching the cake to the invite!  AMAZING.

Seriously, dead on.

Leah's MIL Jean made the invites (she's a cricut nut) and owl picks.

Note to self--straight on shots in this dress?  BAD IDEA!  
Here another look at the Mini Diaper Cakes Centerpieces too!  

how cute is that little stamp!  That's all Jean, Leah's MIL!


Finally, a few repeats from my other posts:

Couture travel wipes clutch.  Tutorial here.
 Custom onesies using the Sily and Freezer Paper.  Tutorial here.

 Baby Shower Door Prizes.  Lots of tutorials here.
 Sweet little infant hats using a knitting loom.  Tutorial here.
 The handmade baby banner!  Tutorial here.

And the sweet Mama herself, Leah! 
Can't wait till baby Wiggles arrives!  I hope you enjoyed your shower :-)

Big (Owl Themed) Smile,