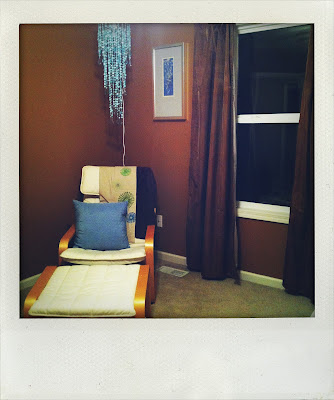
Wednesday, August 1, 2012

How To: DIY Envelope AND Cocktail Napkin Pillows!

Girlfriends!  What's up!?!?!

So, I've started on Paisley's nursery....and it, my friends, is a labor of love!  Especially when you decide that at least 97% of decor will be DIY.  Which I did.  And am in the process of doing.......

Today I wanted to show you these cute DIY pillows I made for her Nursery.  I did two different versions--the Envelope-back pillow, and one made out of a cocktail napkin and flat sheet.  

First up, The Envelope-Back Pillow:
Ingredient List:
Pins 
Sewing Machine
Your choice of fabric--I used blue chevron (above)
Pillow--I used this old one that we have had in our linen closet the past 5 years....(from J Chen's "I don't wanna be a playa no more" days.  Ha! Like he was EVER a playa!)

Now, I didn't do a tutorial, because, well, girl I can barely sew!  I totally winged it.  However, I did find this awesome one for you use--I was pretty close to perfect.  Heeeeyyyyyy girrrrllllll!

Next!  The Cocktail Napkin and Flat Sheet Pillow.  For reals.
Ingredient List:
Pins
Sewing Machine
Cocktail Napkin--or a Fat Quarter/Square of Fabric--of your choice.  I used that cool orange paisley napkin (above).
Flat Sheet--or whatever fabric you want for the back!  I just had some remnants left over after slip-covering the chair above in a white flat sheet.
Stuffing--I used an old pillow I found in a closet and cut it open. Ha!

Now, I also didn't do a photo tutorial for this, but that's because it's stupid-easy.
Step One:  Depending on what fabric you're using, make sure to cut your squares evenly.  I laid the sheet over the napkin and cut to that size.
Step Two:  Place the pretty sides of fabric together (the sides you'll want on the OUTSIDE of you pillow) and pin.
Step Three:  Sew around the edges, leaving about 2 inches open for the stuffing.  Turn right side out. 
Step Four (Optional):  At this point, your pillow is almost done.  (Yay, you!)  Now, this where I added the "P" inital you see above.  I used my Sily (silhouette machine) and cut out a large "P" on dark pink vinyl.  Then I ironed it on the front.
Step Five:  Stuff it, girl!  Using whatever stuffing you have, stuff the pillow to the size you like.
Step Six:  Either sew, glue, or use some interfacing to close the stuffing opening.
Step Seven:  ROCK IT GIRL! 

There you have it, 2 totally unique DIY pillows!  All for you!  Enjoy :)


Big (Pillows can make a room!) Smile,

Thursday, July 5, 2012

White Trash Bash 2012--It's that time again!

Well, per usual, that snuck up on us again!  We're hosting the 4th Annual White Trash Bash next Saturday, July 14th. Considering I'll be in week 24 of my pregnancy, it will be a little more low key this year. And by that I just mean I won't be decorating the inside of the house. I don't know why I've spent so much time on it in the first place; it's an outdoor party after all! I'm keeping the food minimal this year, just snacky-stuff, and I'll put it in the garage. You know, next to the keg of Busch Light. Everything else will pretty much stay the same. Oh, except that I'll be 100% sober...that'll be a change, too ;-)

Just think of all the good pictures I'll get!

I have a small list of things I'd like to craft before next week:
King and Queen of Trash "awards" for best dressed
Beer Can Wreath
Some sort of tablescape for the WTB fixins.

That's about it. We're really just gonna slap it together, which, for a White Trash Bash, should be the objective anyway.

Lost?  Catch up here:
Check out WTB The Series here!   
Check out The 1st Annual WTB here!
Check out The 2nd Annual WTB here!!!!   

Check out The 3rd Annual WTB here!!!!   

Big (Christmas Light ands Duct Tape) Smile,

Friday, June 29, 2012

Inspiration: Nursery

Hey, girl, hey!!!!!

So, I went totally old school here and "designed" (HA!) an inspiration board for Baby Chen's nursery.  Ok, not TOTALLY old school.  Like, I still used a computer.  But I didn't pull everything from Pinterest....put I did pull everything from the inet.....Ok, maybe I lied, it's NOT old school at all!  Whatev!  I did spend a whole lotta time on it.  So now I wanna show it. 

Our main colors are orange and dark pink, with yellow, aqua and white as supporting colors.  We're doing all white furniture, but none of it is matchy-matchy.  And, in true Chen form, the shit pieces I can't make, are coming from Ikea and Urban Outfitters.  SHOCKER.  It's gonna be one modern-meets-hipster nursery!  Because why???  I do what I want!  And because it's not considered "common area", aka, where J Chen thinks his opinions matter. 

We have a long way to go--J just painted last weekend.  We likely won't really get started until after July 15th, but hey, we have a plan!
Click to make it bigger, girl!
Big (let's get this party started!) Smile,

Wednesday, June 6, 2012

We're having a.....

So here's something that happened, once upon a time in 2005....I met this sweet asian boy at a college bar during my *1st* senior year, befriend him, fell in love with him, married him, and am now in the process of having his sweet baby.  Sometimes I wonder how I got this lucky.....After all the bad decisions and selfishness of my youth (ok, even the last few years), I have somehow managed to come out on top of it all, and my life is pretty damn awesome.  And about to get even awesome-er.  Cause I married a sweet boy that couldn't sleep Monday night because he's so excited to be a daddy.  I married a man that writes this on his Facebook page:
I am extremely lucky. And we are having a girl. A dream come true for the both of us. Well before I was a Mrs., we talked about kids and liking the idea of having a baby girl first; again, I can't believe my luck.  I'm having a hard time not waiting for something to go wrong; hopefully nothing does, and I can allow myself to just relax and be happy.  Cause this, is the coolest shit, ever.  


Big (Bacon and Cheesecake are getting a SISTER!) Smile,

Sunday, May 13, 2012

How To: Make Wood Shim Decor

See? I told you I would be back! And in less than a week, at that! Feeling pretty good about it--I didn't lie to you!

So last week one of the projects I said I would be working on was a wood shim wreath.  Well, I made it. And now I'm thinking that I like it better as decor, rather than a wreath. Even though I'm using it as a wreath.....It's totally inspired me for my other huge undertaking, The Baby.Cheniful Nursery. I'm thinking I'm going to do them in lots of colors and sizes for the wall behind the crib. But I won't start that project until after June 4th, Gender Day!

Chenyways, here's how you make a Wood Shim Whatev (wreath or wall decor, or table centerpiece, etc).

Ingredient List:
1 pack of wood shims (14 total)
Spray Paint of your Choice--I'm favoring orange these days
Hot glue and gun

Step One:
Set up your design. I used the paint can as the base to work around. Row 1: 7 shims. Row 2: 7 shims, staggard. This left my design at 17.5" in diameter. If you're looking for something bigger, use a larger base and buy more shims!
  

Step Two: Get to sprayin, girl! You'll need a couple coats.
Step Three:  Form your design around the base again, hot gluing the ends together.
Step Four:  Flip and Glue.
Step Five:  Glue your top layer, then flip and glue again.  
Step Six:  ROCK IT GIRL!

That's it! Now go make something awesome!
Big (Oooh, this would make a good mirror base, too!) Smile,

Tuesday, May 8, 2012

What's in the Works!

Well, hey, girl, hey!

So, I was having lunch with my Rexer yesterday (read: Dad) and he said to me, "You're very behind on your blog." Yep. I sure am. Yooouuuu betcha! But isn't it so effing cute that he actually reads it? Cause I'm pretty sure that besides J Chen, my Rexer is the only one in the fam that digs into B.Cheniful on a regular basis. Well, as regular as my irregular posting allows...

Chenyways, as parents usually are, he was right. I am guilty as charged. I've been napping a lot after work during what was normally my creation time. Baby Chen has me straight tuckered out! But whatevs, you're all busy and tired too, dammit. The least I can do is dedicate a few minutes to the blog!

Alright, well, I don't actually have anything to show you tonight, BUT, I will be showing you what's in the works....


These guys. We bought a new buffet, table and chairs from Ikea in february. As amazing as Ikea is at transforming your rooms with notalotta dollas, it's still, well, cheap. Case in point, the chairs. The little feet thingys were plastic and scratching up the wood floor. So I ordered these rubber footies. But they didn't get here soon enough and J bought other ones. So, I have $20 worth of rubber feet to turn into something super awesome. Consider it done. At some point....


Next, I bought like 6 or 8 of these packs of wood shims. I plan to paint them an awesome shade of something and turn them into a, GASP, wreath.


I got these little morsels the other day and they're just waiting to be created into something special. I'm *thinking* about making a couple of them into buttons to place on a super cute sweatshirt-esque blazer I got over the weekend. You know, cause it was missing a button and "there was nothing they could do for me". And that's what happens when you shop at DOTS. On purpose...


Lastly.....And the biggest project BY FAR, will be turning "The Hershey Kiss Room," AKA "The Shoe  Room" into "The Nursery for one Baby Chen". 
Soooooooooo much to do! Soooo many ideas! I have a feeling this will be a mulitple-post extravaganza. For sure, girl!

So there you have it! Stuff I promise to work on and actually write about.  It's going to happen.....it's going to happen....it's GOING TO HAPPEN, dammit!

Big (Big Plans, Girl!) Smile,

Monday, April 16, 2012

There's a Fortune Cookie in my Oven!


I told you I was cooking up something good! :)

So yeah, baby makes 5!  Cause clearly we're counting Bacon and Cheesecake Chen in there, too!  Our first babies :)

We found out on February 20th and I've been dying to spill the beans ever since!  But, as they say, it's best to wait a bit.  We told our 3 sets of parents first, and all on the same day so no one would feel left out--it's the first Grandbaby for everyone.  Which meant we had to call them, not face to face.  With the exception of Rexer (my dad) and Lynda (my stepmom) because we already had plans to see them that weekend.  Mama Chen shrieked and thanked us--so presh!  My mom and sister shared equal yelling.  And once Rexer and Lynda put this together:
pretty self-explanatory, yes?
They each had their own adorable reactions....Rexer cried, just a little :).  Lynda gushed, and said, "you know, I just had a feeling...."

We made our official Facebook announcement last week after our first ultrasound.  The baby measured exactly 11 weeks (which is was!) and had a heartbeat of 170.  Girl?

Because we (fine, I) couldn't just write a status update what was like, oh hey, Baby Chen on the way.....I called in my girl Lila (from Lila Armock Photography) and we did a quick Mini Session.  But because we weren't that far along, we needed a prop so that it would be obvious.  Not like, "oh, look at that, they took MORE photos of themselves!"  So, I went with the chalkboard....And here are the causalities that followed...

An attempt at using actual chalk on the chalkboard....HOT MESS.
 1st attempt at using vinyl.....getting warmer, but no dice yet....
 FINALLY!
And there you have it, an announcement chalkboard was born!


YAY FOR BABY CHEN!  I can't wait!  Plus, think of all the cool--not just for babies!--DIY projects I'll have you show you.  Holla! :)

Big (I'M GROWING A HUMAN!) Smile,

Saturday, April 7, 2012

How To: Make a 5 Ingredient Lemonberry Trifle


Happy Easter Eve, Friends!

I know I've been away for a bit again, but I PROMISE I have some things in the mix for ya, coming SOON!  For now, I'd thought I'd show you this KILLER trifle I whipped up today.  In a word: DELICIOUS!

My family does a brunch for Easter, all the way out in Beal City, Michigan.  (farm town, USA.)  My Mother, for the second year in a row, has asked me to bring "something sweet."  Ok then.  This is actually more tart than sweet, but as we all know, I do what I want.  And it's gonna be BOSS. Boss I tell you!

Now, I'm sure that this recipe probably exists someplace out in the Pinterest world, but for all intents and purposes, this is a B.Cheniful Original, and I came up with it myself.  So here we go!

Ingredient list:
1 Angel Food Cake (store bought, yes please!)
2 Cans of Lemon Pie Filling (or one Large)
1 Pint Fresh Strawberries
1 Lemon
2 Containers of Cool Whip (or one Large)


Steps 1-3

Step 1:  Cut your strawberries up nice and cute! Or, I guess technically, lengthwise.
Step 2:  Cube your angel food cake.
Step 3:  Mix both cans of pie filling with 1 container of cool whip. Zest lemon into filling, then squeeze lemon juice into mix as well.  Fold.

Steps 4-6

Step 4:  Gather up your goodies and get ready to rock this trifle!
Step 5:  Add a layer of angel food to the bottom, then place strawberries around the sides. Add a layer of lemon filling.
Step 6:  Add a later of strawberries atop your filling, rinse and repeat!

Step 7:  Add a layer of cool whip to the top of your trifle.  You're done girl, now rock it!

Have a super Happy Easter!

Big (Mmmmm, lemonberry trifle!) Smile,

Thursday, March 22, 2012

How To: Chevron Pattern Easter Wreath


Well, hey girl, hey!

Considering it's practically summer here in Michigan--for real, 86 yesterday--and my daffodils are already up, you'd think we skipped Easter all together.  Nope, not so much!  Still two more weeks to go and I still have my St. Patty's Day wreath up.  I'm calling it my Michigan State University (GO STATE!) wreath--it IS March Madness, ya'll!  (yo, did I just say ya'll?)

Chenyways, I did make an Easter wreath (SHOCKER) and thought I'd show you!

I worked with the top of the wreath facing me.  It's how I roll.
Ingredient List:
Wreath Form (mine came wrapped in burlap)
Plastic Eggs
Hot Glue
Hot Glue Gun
Ribbon


Step 1.   Determine your egg pattern to be used on the wreath.  Here we're using a Chevron Pattern (Charlie Brown Stripe) in assorted colors.

Step 2.  Starting at the top of your wreath, begin hot gluing your eggs into "V Shape" patterns, as shown.

Step 3.  Continue your pattern around to complete the wreath, gluing egg tips together to secure your wreath.

Step 4.  Tie a bow at the top of your wreath to finish it off. 

Step 5.  Rock it girl!  Hang that baby up and enjoy for the next 2 weeks! ;-)

Big (Momma Nature is totally skipping Easter!) Smile,

Monday, March 12, 2012

An Observation

Hello Sports Fans!

I'm always thinking about my blog, and how little I am able to always update it.  My "problem" is, I think that to have a creation blog, one must, well, create.  However, many of my favorite blogs don't do a lot of the creating themselves.  They tend to find something cool--likely from Pinterest--and then repost those tutorials on their site.  The thing is, I could do that too.  I could probably even commit to doing that 5 times a week.  But I always wonder, is that cheating?

So the deal with me is....(well, many things!) that when I write a post, it is always a tutorial that either I have come up with on my own--and committed HOURS and HOURS to create/photograph/write, like my Sunburst Mirror or Up-Cycled Heels--or found somewhere else, but showed you my version--example, my Cupcake Pincushions.  I took a teacup pincushion and applied my passion for food.

So, I just wonder, dear readers, would you rather see an actual tutorial from me or a paragraph about someone else's?  Or doesn't it really matter to you?  Tutorials are tutorials after all, however I can't promise that they'll be as witty as mine ;-)

Big (hmmmm) Smile,

Friday, March 2, 2012

How To: Make a Brownie Trifle

Pin It


Oh hi.  I  made this.  -->

It's a brownie trifle of sorts with lots of other yummy stuff in it.  It was super good.  I think you should make one, too.

Ingredient List (actually makes sense this time!)
Brownies--either mix and make or buy em, girl!
2 Boxes of chocolate instant pudding
1/4 cup Kahlua--I used a cheap knock off, thanks.
1 large container cool whip
8-pack of Heath Bars--at least I think they come in 8-packs...
Container of Raspberries
Trifle Dish--MUST HAVE.  Or don't do it at all.  :)

Step One:  Let's say you bake your brownies--once out of oven, punch some fork holes all over and pour in the Kahula.  Allow to cool.  It's ok if you bought them, too!  Leave them be till Step Four.

Step Two:  While that's cooling, make up your pudding and mix with 3/4 of your cool whip.  Set aside.

Step Three:  Crush your candy and wash your berries.  Set aside.

Step Four:  Cube your brownies and set aside.  Add Kahlua now if they're store bought.

Step Five:  Layer, girl!  Brownies, candy, pudding, berries, repeat.

Step Six:  Top with remaining cool whip, candy and berries.

Step Seven:  ROCK IT GIRL!


And now you have a super easy go-to dessert to impress your friends and fam.  You're welcome!

Big (the Kahlua is optional, but why would you ever do that???) Smile,
Tip Junkie handmade projects